Redux and Redux Toolkit: A Beginner's Guide to State Management
Let's Explore the State Management in React Applications
Introduction
When I began learning React, I faced a bunch of challenges, and one big puzzle was Redux. At first, Redux seemed really complicated to me. And guess what? I'm not alone! Many newbies find the whole idea of state management a bit tricky to wrap their heads around. But don't worry, that's where this blog comes in.
In this blog post, I'm going to break down Redux, talk about Redux Toolkit, and explain the whole state management thing. By the end of this, you'll feel much more confident about managing the state in your React apps.
So, let's jump right in!
Why Do We Need Redux and State Management?
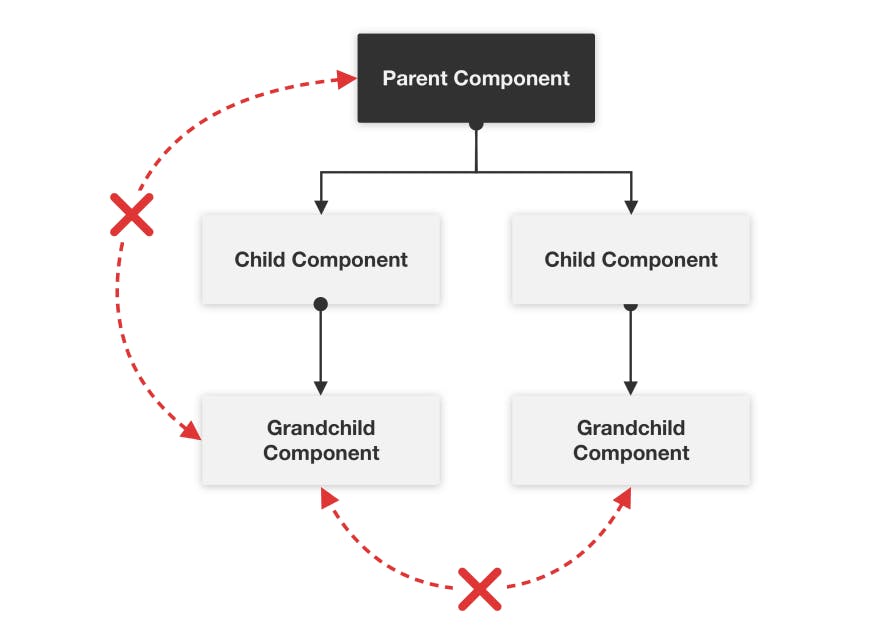
Let's start by understanding why Redux and state management are important. In React, everything revolves around components. We create different components and group them together in a file called 'App.js'. Now, imagine you want to share information between these components. Typically, we do that by passing data from a parent component to its child component. This is how we usually work, but there's a catch. You can only pass data from the parent to the child, not the other way around. In other words, the child can't easily share data with the parent.
Let's take an example. Imagine a marketplace website where the parent component has various items with their prices. The child component might make an API call to get updated prices. But here's the hitch: it's not straightforward to tell the parent component about these new prices. This can lead to a bit of a headache. Does that make sense so far?

Introducing Redux: Solving React's Challenge
To tackle this concern, React brings us a powerful solution called state management. And guess what? Redux and Redux Toolkit are the superstars for this job when it comes to React. These tools are all about managing the state of your React application.
Think of Redux as your trusty JavaScript sidekick that takes care of your app's state. Imagine you're crafting an awesome e-commerce website. You've got to keep tabs on user details, their cart stuff, payments, and all those nitty-gritty things.
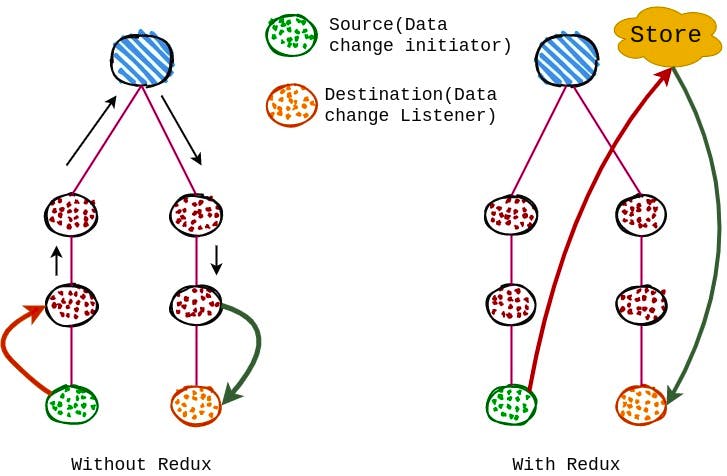
Instead of passing information around between different components of your app using props, Redux has a better plan. It gives you a central storage to store all this valuable data. And the best part? Any component of your app, whether it's a parent component or a child component, can easily access, delete or update the data from this shared storage space. No fuss. This approach is like magic for handling complicated situations and maintaining an organized app.

Why Choose Redux for Your React Apps?
Okay, so now you might be thinking, "Why should I even bother with Redux?" Fair question. Let me break it down for you.
Imagine your React app growing in size and complexity. You've got components left and right, and they need to share and manage a bunch of information. This is where Redux steps in like a superhero.
Central Command Center: Redux gives you a central storage or hub to manage all your app's data. No more confusion about where data is or how to access it. It's all in one organized place.
Easy Data Sharing: Say goodbye to passing data through layers of components using props. With Redux, any part of your app can access the data it needs directly. No more headaches.
Predictable Changes: Redux sets some rules on how data changes. This makes tracking and debugging way simpler. You'll always know where and why a change happened.
Time Travel, Seriously: Redux lets you rewind and fast-forward your app's state changes. It's like time travel for debugging, helping you understand and fix issues with ease.
Reusable Logic: Got some code that's used in multiple places? Redux lets you keep that logic separate and reuse it across your app.
Community Love: Redux has a massive community of developers who use and contribute to it. That means tons of resources, tutorials, and solutions when you're stuck.
So, if your React app is getting ambitious and you want a clean, organized, and powerful way to handle its state, Redux is your go-to friend. It's like having a reliable sidekick that makes your coding life way easier.
How Does Redux Work?
Alright, let's dive into how Redux gets things done. Remember, it's all about keeping that data under control.
As we mentioned earlier, Redux introduces a clever system. It sets up a single, main storage spot – we call it the "store." This store is like your app's memory vault, holding all the data.

Now, every component in your app can chat with this store. They can ask for data or send new data there. This way, all your components can stay on the same page, sharing info without confusion.
The magic happens through a few important players:
The Store: This is where everything's kept – all the data, no matter how big or small. It's the heart of Redux.
Actions: Think of actions as messengers. When a component wants to change something in the store, it sends an action to the store. The action carries info about what needs to change.
Dispatch: Dispatch is like a super-smart operator. It receives actions and sends them to the right place in the store.
Reducers: These are like the assistants. They take the action's message and actually make the change in the store's data.
So, here's how the dance goes: A component wants to change something. It sends an action to the store. Dispatch gets the action and gives it to the right reducer. The reducer makes the change in the store. And boom, your app's state just got a refresh!
It's like teamwork: each player does its part to keep the store in perfect harmony. This way, you've got a clear and organized way to manage your app's state.
Transforming Theory into Practice: Let's Code!
We're not stopping at theory – it's time to roll up our sleeves and start coding! But before we jump in, let's make sure we have the right tools. We need to install a couple of crucial packages to set the stage for our coding adventure.
Step 1: Essential Package Installations
Before we begin, open up your command line and enter the following commands:
npm install react-redux
npm install @reduxjs/toolkit
The first package, react-redux, is like the bridge connecting Redux with React, forming a dynamic duo for state management. The second package, @reduxjs/toolkit, is our secret weapon – a toolkit that simplifies the complexities of Redux, making our coding journey much smoother.
Now that we've armed ourselves with these powerful packages, we're fully equipped to turn our concept into a reality of code using the magic of Redux!
Structuring Our Project: Organizing Files
Let's get our project structure in order. I've set up a couple of important files to keep things neat and organized: store.js and reducer.js.
Step 2: Creating Essential Files
In the world of Redux, keeping things tidy is key. That's why I've created two files to streamline our state management:
store.js: This file plays a central role. It's where we initialize our Redux store – the heart of our app's state. Think of it as the storage unit that holds all our data.reducer.js: Here's where the magic happens. This file holds the functions that manage how our app's state changes. These functions are the decision-makers, determining how our data gets updated.
With these two files in place, we're laying a strong foundation for our Redux-powered react-app.
store.js
import { configureStore } from "@reduxjs/toolkit";
import { customReducer } from "./reducer";

const store = configureStore({
  reducer: {
    custom: customReducer,
  },
});

export default store;
In the above code, I have initialized the store. and the with customReducer
reducer.js
import { createReducer } from "@reduxjs/toolkit";

const initialState = {
  value: 0,  //here I set initial state to zero (0).
};

// here are the custom reducer functions to manipulate the state of value,
// variable. In the customReducer there are 3 functions.
export const customReducer = createReducer(initialState, {
  increment: (state) => {  // to increment the value
    state.value += 1;
  },

  incrementByValue: (state, action) => {
    state.value += action.payload;  // increment value by value
  },

  decrement: (state) => {
    state.value -= 1;  // decrement the value
  },
});
All set, now we see how to use it ok.
Below is the example code that how you can use it in the react component.
Home.jsx
import React from "react";
import { useDispatch, useSelector } from "react-redux";

const Home = () => {

// getting value state which we initialize in reducer
  const value = useSelector((state) => state.custom.value);

  const dispatch = useDispatch(); //dispatch method

  const addBtn = () => {
    dispatch({
      type: "increment",  //  to increate value state
    });
  };
  const subBtn = () => {
    dispatch({
      type: "decrement",  //  to decrement value state
    });
  };
  const incByValue = () => {
    dispatch({
      type: "incrementByValue", // button to increment value by value
      payload: 25,
    });
  };
  return (
    <div>
      <h2>{value}</h2>
      <button onClick={addBtn}>Increment</button>
      <button onClick={subBtn}>Decrement</button>
      <button onClick={incByValue}>Increment By Value</button>
    </div>
  );
};

export default Home;

// This is the basic implementation that how you can implement
// the state management. I you understand the code you will get the
// clear idea of redux, redux-toolkit, and state management.
Wrapping Up: Embracing Redux and State Management
And there you have it – a sneak peek into the world of Redux and state management. With the groundwork laid, you're ready to harness the power of Redux in your projects. By understanding the concepts we've covered and putting them into practice, you'll be able to manage your app's state with ease, flexibility, and organization.
This is how we use Redux and state management. By structuring our code with a central store, crafting actions, and letting reducers handle the logic, we ensure that our app's data flows smoothly, and our components work in harmony. Remember, Redux is your sidekick, helping you build cleaner, more efficient applications.
So, what are you waiting for? Dive into the world of Redux and unlock the potential of seamless state management in your React apps.
Happy coding!
